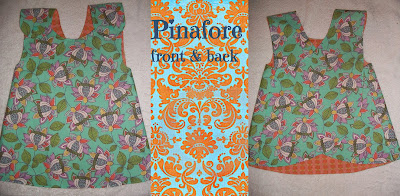
I love, love, love pinafores on little girls. They are so versatile. You can put a long-sleeved shirt and leggings under it in cold weather and it grows with your little one, starting out as a dress and ending up as a shirt. Multifunctional and adorable, what more could you ask for?
This is the second reversible pinafore I have made for Monkey. I got the original 6-12 month pattern from Smashed Peas and Carrots, but have had to modify it a lot for my 22 month old petite little miss (the original pattern was way to wide for her and slipped right off her shoulders). This version is better, but there are a few more alterations I want to make. I will post the final pattern when I finally get it adjusted.
You will need 1/2 yard of each print (I used 4 fat quarters), coordinating thread, and 2 sets of snaps or 2 buttons.
Cut pattern from both prints of
pre-washed fabric. Don't forget to
flip the back panel pattern over
before cutting the second piece or
you will essentially end up with 2
left sides or 2 right sides.
Pin back panels to front piece,
right sides together, and sew.
Then press the seams (this is an
important step that really makes
homemade projects look more
professional, so don't skip it!).
Pin the 2 print to each other, right
sides together. I like to err on the side
of caution, and use a lot of pins.
Mark a 2-3 inch section across
the bottom, so you will remember
to leave and opening for turning.
Sew pieces together (I use a 1/8 inch
seam allowance, but you can use
what you are most comfortable with),
backstitching about an inch on either
side of the space you left open for
turning.
Before turning, clip little Vs on the
curves of the straps, neck, and arm
holes. This will help the fabric lay
flatter once it is turned right side out.
Turn right side out, press, pin
opening closed, and topstitch using
the smallest seam allowance you
are comfortable with (this helps
your finished product look more
clean and professional).
Add snaps or buttons, and put it on your cutie!


No comments:
Post a Comment